MaestroConference Quick Start Guide
Download as PDF
Log In
Go to maestroconference.com click My Account and login. (Call or email support if you need further assistance.)
Create Conference
- Click Conference at the top of the page.
- Click Create Conference and fill in the Conference Name.
- Contact Email: this is the email that participants will see when they register for the event.
Select:
- Scheduled Event: One time event where you set the Start Date, Start Time, and Duration (all times are in PST.) Enter the Estimated number of callers.
- Reservationless can happen anytime, so it's good to use for impromptu, ad-hoc conferences. A reservationless conference will always use the same PINs and is limited to 25 people.
Conference Settings
Once you have completed the above steps, click Create Conference at the bottom of the page. This will bring you to the View and Edit page for your conference. From here you will be able to customize your conference even more.
Add Participants
In order to invite participants to your meeting you will need to select one of the following options:
- Option 1: Copy/paste the Caller Registration Link into an email or share via social media, this allows participants to self-register and obtain their call-in information.
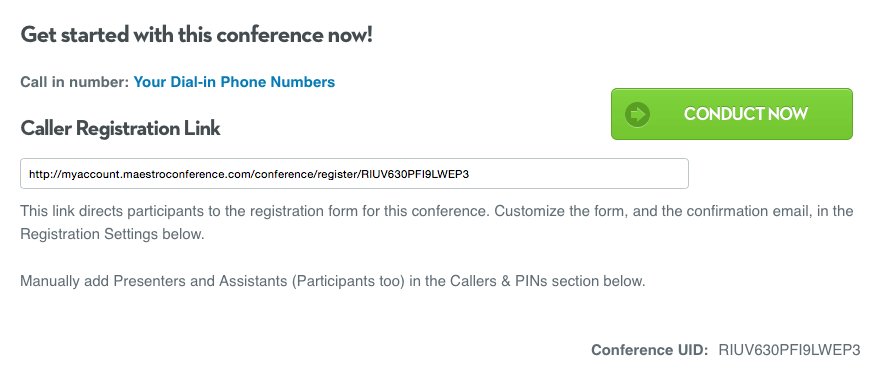
- Option 2: As the host - manually add participants by visiting the Callers & PINs section, click Add Participant, this will generate the participant's 6-digit PIN. Then click on name and email to enter personalized information. Press Save after you complete each entry.
- Option 3: You may also enter participant information by uploading a spreadsheet or CSV file. Please click Upload Registrants and follow instructions to upload your file. For more comprehensive directions, please click here.
Note: As the host, you can return to the Callers & PINs section at any time, click Download Registrants and export a spreadsheet with participant information.
Participant Web Experience
Here you will specify the type of event you would like to host. We recommend using Social Webinar for all your events!
The system defaults to Audio Only. If you would like to use Social Webinar or Screenshare, please make your selection before you share the registration link with your participants. After you make your selection, scroll down to the bottom of the page and click Save Changes.

Other options for further enhancing your conference
Conference Visibility
If you opt to make your event “public” MaestroConference will display a list of public available events on our website, which will help you get the word out about your work!
Registration Settings
This is another place to see the registration URL. You can also customize the message for all confirmation and reminder emails. This is also where you can find any registration comments.
Create Custom Fields
Custom fields are used to allow advanced sorting of participants when they are in the event. You can sort your participants in the event into breakout rooms. These are limited to simple values, which must be pre-determined by the host.
Outbound Calling
When Outbound Calling is activated, the person trying to get in will receive a call which will let them join the conference. This feature is available to Presenters, Assistants and Participants. Outbound Calling is currently available to reach callers with US numbers only.
Survey Settings & Results
This is where you can enable/disable the Participant Survey and where survey results are displayed once submitted.
Advanced Settings
This section is where you will find the actual URL of the Conductor Interface for sharing with other presenters. (The Large Call Conductor Interface is only used by our Event Technicians, who will use this special tool to run large calls.)
Call History
Here you find historical data about the event. Call recordings, list of participants who attended, or did not attend, list of registrants, Caller ID information of all callers, duration of the call and more.
Screenshare
The Screenshare section is where you will find all the URLs and links to start the Screenshare tool. Only one person can use the link “Launch the Presenter” at a time. Other conductors who will be conducting a Screenshare session must use the co-presenter URL listed here. The Viewer URL is for participants’ use and is sent out with all confirmation and reminder emails.
Social Webinar
The area where basic permissions and settings for Social Webinar are located.
Premium Recording
If you look through this section, you will find the complete instructions on the premium recording feature. This is also where you manage the Premium Recordings setting.
Dialing In — For hosts and participants
Whether you are a Host, Assistant, or Participant, there are several ways to access an event. Help for these is available at the Getting In page and is referenced in both the email and confirmation page.
- Use assigned phone/PIN: Dial into the number assigned to you at the time of registration using phone or VOIP and enter the PIN. A complete list of access numbers including international calling can be found here.
-
Skype to Skype: Add mcdirect1 or maestro4294 to your Skype contacts (it is recommended that this is done at least a day or more before the conference.) Note: Calling with Skype works only on PC and Mac desktop computers, not on mobile devices (iOS or Android).
- When you are ready to login to the conference, “call” the Skype contact you added for MaestroConference.
- To input your PIN, you need to left click with your mouse on the Call button on the dashboard at the top of your Skype screen (not the green button under the contact), scroll down and click on Show Dial Pad.
- Skype: Use your SkypeOut credit and call 530-216-4294.
- WebRTC Webphone: Coming Soon!
Hosting an Event
- You must dial in, before attempting to conduct your event.
- At the time of the event, click Conduct Now which will launch the conductor interface.
- A settings window will open where you can select the default mic setting for callers entering the conference.
- To assign a mic setting for a caller type, just click on the mic buttons Mute, Breakout Only or Public.
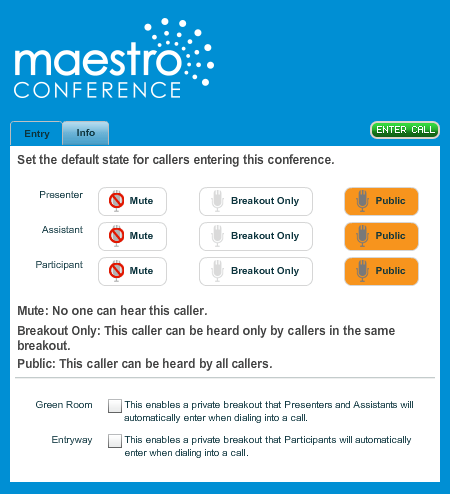
After you have checked and/or modified initial mic settings, click Enter Call.
Note: If you need to access the default mic setting page during the conference, click Settings.
- During the conference, you may modify individual mic settings by clicking on participant(s) name, and by clicking the Mute, Breakout Only or Public buttons located on the right side of the conductor interface (detail panel) or by clicking on the microphone next to the participant name in the caller panel.
- Participants may mute/unmute themselves by pressing "6" on their telephone keypad.
- As participants dial in, their names will appear in the center column (caller panel). Summary information appears on the left side (summary panel), with a chat box underneath. Detailed information for selected callers will appear on the right side of the screen (detail panel).
Participation: Hands
- Participants can raise their "hands" using the 1-5 keys on their telephone keypad; by using the Skype keypad or in Social Webinar, by clicking on the numbered hands.
- Results are displayed next to individual callers in the center or caller panel and aggregated in the summary panel.
- Results are also displayed in the detail panel for selected callers.
- Conductors can lower all hands by clicking the "Down" button in the Hands section of the summary panel.
Using Social Webinar
It runs itself and gives you many options!
- When you are ready to launch the event, dial in as you normally would and launch the conductor interface.
- To launch the Social Webinar, Participants simply click the link in the confirmation/reminder email. Hosts need to go to http://social.maestroconference.com (or use the conductor interface method outlined in step 5.)
- Hosts need to enter their email address and PIN for the call. Alternatively, hosts can simply click their name in the conductor interface, and go to the info tab in the details box on the right, then click Login this caller.
- Follow prompts to create a profile (participants will do the same). Upload a photo, contact information, and optionally link to your social media accounts such as Facebook, Twitter, Google, and LinkedIn.
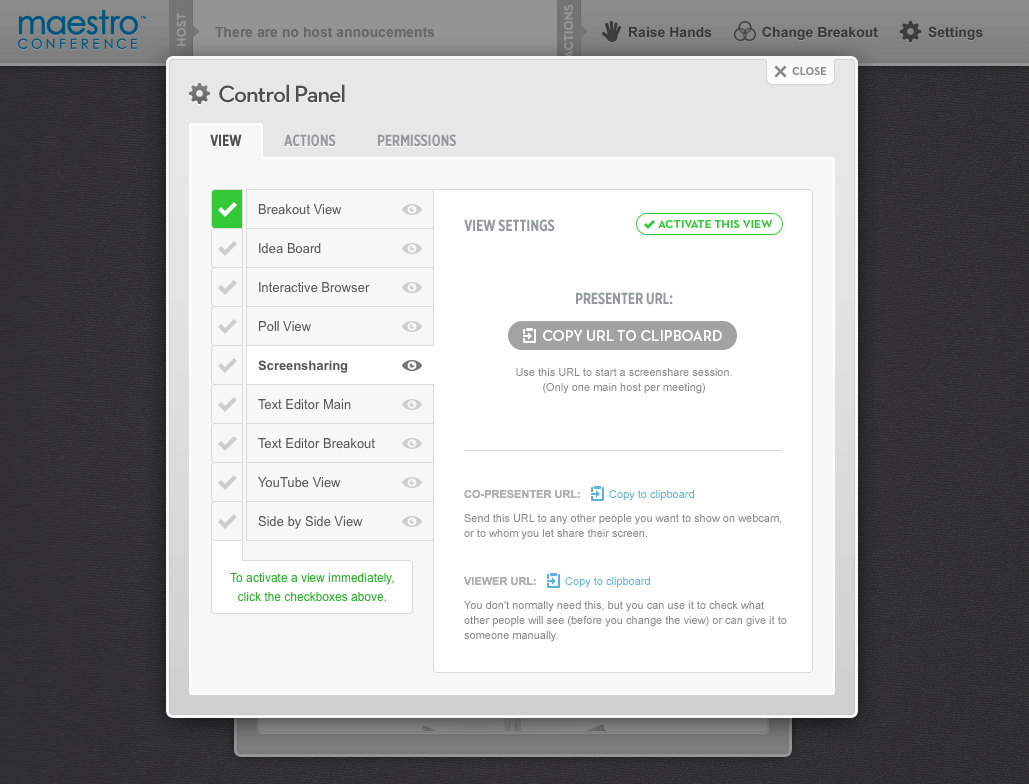
- To link the Social Webinar to the Conductor Interface you will need to:
- If you have not done so already, click Conduct Now from your list of scheduled conferences.
- Go to the address bar, and copy the entire website address (this is the conductor link.)
- In Social Webinar, Click Settings, Control Panel, and paste in the copied conductor link. Click Login and Save.
- Once you have linked the conductor interface, you can manage what participants see on their end.
- Access this by clicking Settings and Control Panel.
Poll View
This allows participants to see the results of polls taken during the call. Simply ask a question, allow time for participants to respond using 1-5 on the telephone keypad, and share the data using Poll View.
Screenshare
Allows hosts to share their screen with participants or have an assistant take over and share their screen. Please view the detailed directions on how to utilize Screenshare.